
Chances are you've heard of AutoPkgr, the fantastic GUI for AutoPkg created by the folks over at the Linde Group. I've mentioned it a few times on the blog and for folks that are new to the Mac device management game, it's pretty much a necessity. Admins that are comfortable working through the command line are probably already using AutoPkg through Git, but the nice thing about AutoPkgr is that it handles the setup of AutoPkg through Git, makes sure the required components are installed, assists in updating the components when needed, and doesn't require familiarity with AutoPkg's CLI.
Although the Github repo has a Basic Usage doc, I thought it might be useful to show you how I configure, install, and use AutoPkgr day-to-day. This will be useful for admins that tend not prefer or are not comfortable working directly with tools that require the use of a CLI. This will be particularly useful if you have been told about the wonders of AutoPkgr but are unfamiliar with its components (AutoPkg and Git specifically).
Important note before you read on...
A critical component to autopkg 1.x is verifying and trusting recipes that you run. AutoPkgr does not include this functionality by default and you will have to dip into the CLI to update-trust-info on the overrides you make to verify the recipes you want run. Please see this documentation and look for a future blog post that covers this information.
The box should have the following:
- Mac OS X, probably 10.10.x or 10.11.x depending on your preference
- A reasonable amount of RAM (you don't need a lot of horsepower, but at least 8GB seems like a good idea)
- A decent hard drive, at least 500GB (if you have a 2012 Mac Mini Server with a second drive, even better)
- A dedicated internet connection for said box
2. Run the installer (and marvel at the lovely installer package with custom logo and layout).

3. Once you drag the app into Applications it's ready to run.
4. When you have AutoPkgr open, you'll notice a few tabs. The first one to focus on is the Install tab. This is where you'll install the components you need to use AutoPkgr. Run the AutoPkg installer first, and once it's downloaded the little dot next to it will turn green. Then, install Git; once installed the green indicator dot will illuminate.
5. Alright! You have what you need to start download deployable pkgs from AutoPkgr. It's really that simple.
2. In the tab you'll see two primary sections. The top is a list of repos, the bottom is a list of recipes (which will start out empty).

In a nutshell, recipes are what build the deployable pkgs, while repos are repositories that store the recipes.
3. To start, find a pkg you'd like to have downloaded automatically when a new version is available. We'll use Flash as an example. To find a pkg that someone has a recipe for in AutoPkg, use the Search for a recipe on GitHub field to find the app in question.

Flash is a pretty popular app to deploy, for obvious reason (ummm hey Adobe, maybe don't make your plugins so vulnerable all the time, just saying).
As you use AutoPkgr you'll get more familiar with the different recipes types. Many people create recipes designed to upload the pkgs directly into their MDM solution, like the JSS (JAMF), Munki, FileWave, etc. I tend to manually upload things so I always look for a .pkg recipe.

Now that I have a recipe for the pkg I want to download, I can click the Add Repo button. This adds the repo that contains this specific .pkg recipe into my recipe list.

As you can see, I now have the repo saved and a green status light shows to let me know the repo is available to get recipes from.
5. Now that I have a repo with the Flash recipe I want, I can find that pkg recipe in the recipe list and tick the box to tell AutoPkgr that it's a recipe I want to check on a schedule.

Now that I have the recipe marked as one I want to track, I can right-click and run the recipe one-off, or have AutoPkgr check for it on a schedule.

6. In the Schedule tab, you can tell AutoPkgr how frequently you'd like it to check the recipes for updates. You can have it run at particular times each day, each week, or every certain amount of hours. I'm a bit obsessive so I have it run every 3 hours.

7. To find out when there's a new package downloaded, you'll want to configure the Notifications tab. You can use a local SMTP server to send emails, or integrate with Slack or Hipchat if your company uses those. We have an Alerts channel set up in our company HipChat that dumps in AutoPkgr alerts (as well as other alerts from other services). If you decide to run AutoPkgr on your own work machine, you can use Mac OS X notifications (not as useful on a server or other box).

Depending on what kind of notifications you want, you'll probably want to adjust which actions trigger notifications. I tend to just be interested in when a new package is ready for me to test.

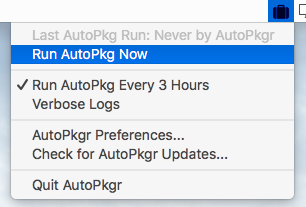
8. Once you have a recipe, a schedule, and notifications configured you're ready to get packages! You can wait until the schedule runs, or you can click on the AutoPkgr icon in the menu bar and tell it to run. You can check on where the pkgs will be saved in the Folders & Integration tab.
If you leave the Folders as the default, it'll look like this:

Recipes will be saved in the Cache folder, which means that is where you'll go to get the pkgs once they are downloaded.
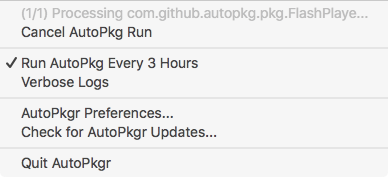
9. I've gone ahead and Run AutoPkg, and it's in the process of getting Flash for me.
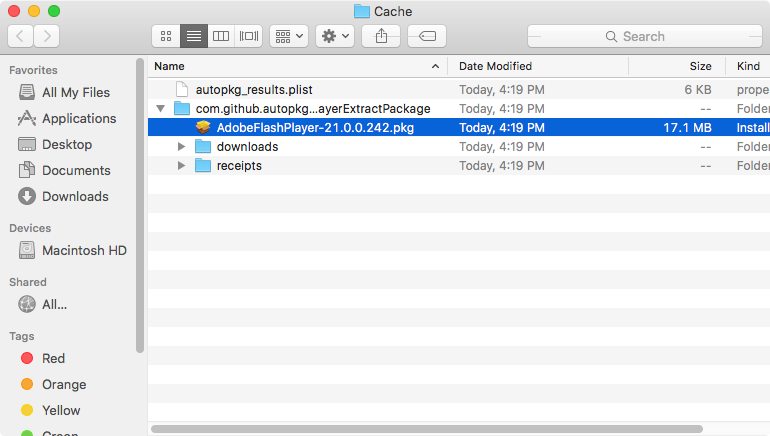
When the recipe has finished running, I can check in the default folder location for the downloaded package.

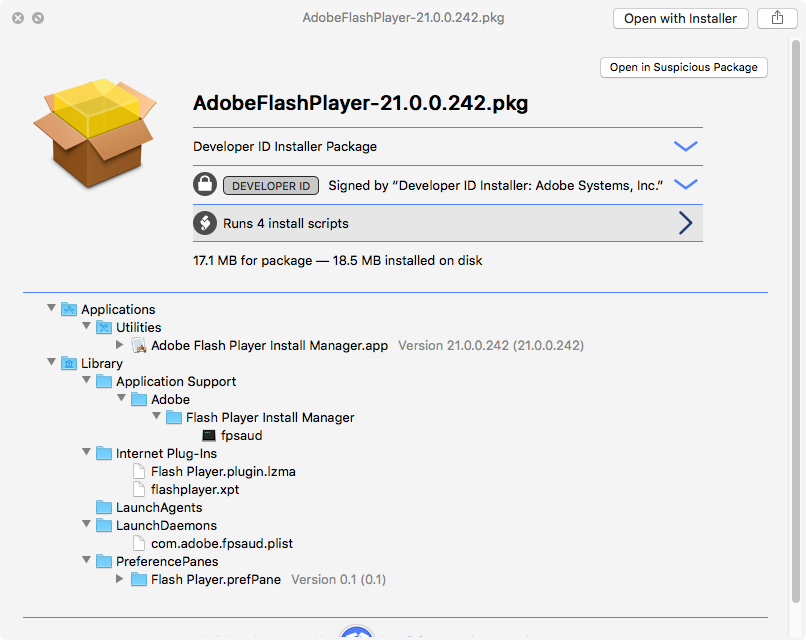
11. If you have Suspicious Package handy, you can check the contents of the downloaded pkg before you test the installer.
12. Once you have the pkg (or whatever other recipe type you prefer) you can test, upload to your MDM service of choice, and be on your way. There really isn't a better way to get pkgs! (Except maybe setting up some integrations in the Folders & Integrations tab to automate uploading them to your management service automagically…)
Did you find this post useful? Leave me a tip!
💖
Although the Github repo has a Basic Usage doc, I thought it might be useful to show you how I configure, install, and use AutoPkgr day-to-day. This will be useful for admins that tend not prefer or are not comfortable working directly with tools that require the use of a CLI. This will be particularly useful if you have been told about the wonders of AutoPkgr but are unfamiliar with its components (AutoPkg and Git specifically).
Important note before you read on...
A critical component to autopkg 1.x is verifying and trusting recipes that you run. AutoPkgr does not include this functionality by default and you will have to dip into the CLI to update-trust-info on the overrides you make to verify the recipes you want run. Please see this documentation and look for a future blog post that covers this information.
Requirements/Recommendations
If you plan on deploying packages that you get through AutoPkgr on a regular basis, I recommend having a box that can be up and online at all times so it can check for updates at regular intervals without interruption. You can treat this as a packaging server of sorts. A Mac Mini you can VNC/RDP into works well for this if you're not a fan of ssh.The box should have the following:
- Mac OS X, probably 10.10.x or 10.11.x depending on your preference
- A reasonable amount of RAM (you don't need a lot of horsepower, but at least 8GB seems like a good idea)
- A decent hard drive, at least 500GB (if you have a 2012 Mac Mini Server with a second drive, even better)
- A dedicated internet connection for said box
Installing AutoPkgr and Components
1. Once you have some kind of box to use for AutoPkgr, sign into it and download AutoPkgr from the project repo on Github.2. Run the installer (and marvel at the lovely installer package with custom logo and layout).
3. Once you drag the app into Applications it's ready to run.
4. When you have AutoPkgr open, you'll notice a few tabs. The first one to focus on is the Install tab. This is where you'll install the components you need to use AutoPkgr. Run the AutoPkg installer first, and once it's downloaded the little dot next to it will turn green. Then, install Git; once installed the green indicator dot will illuminate.


5. Alright! You have what you need to start download deployable pkgs from AutoPkgr. It's really that simple.
Using AutoPkgr
1. The next step is to get an idea of how to find pkgs you want, and where they're saved so you can get to them and test/deploy. Head over to the Repos & Recipes tab.2. In the tab you'll see two primary sections. The top is a list of repos, the bottom is a list of recipes (which will start out empty).
In a nutshell, recipes are what build the deployable pkgs, while repos are repositories that store the recipes.
3. To start, find a pkg you'd like to have downloaded automatically when a new version is available. We'll use Flash as an example. To find a pkg that someone has a recipe for in AutoPkg, use the Search for a recipe on GitHub field to find the app in question.
Flash is a pretty popular app to deploy, for obvious reason (ummm hey Adobe, maybe don't make your plugins so vulnerable all the time, just saying).
As you use AutoPkgr you'll get more familiar with the different recipes types. Many people create recipes designed to upload the pkgs directly into their MDM solution, like the JSS (JAMF), Munki, FileWave, etc. I tend to manually upload things so I always look for a .pkg recipe.
Now that I have a recipe for the pkg I want to download, I can click the Add Repo button. This adds the repo that contains this specific .pkg recipe into my recipe list.
As you can see, I now have the repo saved and a green status light shows to let me know the repo is available to get recipes from.
5. Now that I have a repo with the Flash recipe I want, I can find that pkg recipe in the recipe list and tick the box to tell AutoPkgr that it's a recipe I want to check on a schedule.
Now that I have the recipe marked as one I want to track, I can right-click and run the recipe one-off, or have AutoPkgr check for it on a schedule.
6. In the Schedule tab, you can tell AutoPkgr how frequently you'd like it to check the recipes for updates. You can have it run at particular times each day, each week, or every certain amount of hours. I'm a bit obsessive so I have it run every 3 hours.
7. To find out when there's a new package downloaded, you'll want to configure the Notifications tab. You can use a local SMTP server to send emails, or integrate with Slack or Hipchat if your company uses those. We have an Alerts channel set up in our company HipChat that dumps in AutoPkgr alerts (as well as other alerts from other services). If you decide to run AutoPkgr on your own work machine, you can use Mac OS X notifications (not as useful on a server or other box).
Depending on what kind of notifications you want, you'll probably want to adjust which actions trigger notifications. I tend to just be interested in when a new package is ready for me to test.
8. Once you have a recipe, a schedule, and notifications configured you're ready to get packages! You can wait until the schedule runs, or you can click on the AutoPkgr icon in the menu bar and tell it to run. You can check on where the pkgs will be saved in the Folders & Integration tab.

If you leave the Folders as the default, it'll look like this:
Recipes will be saved in the Cache folder, which means that is where you'll go to get the pkgs once they are downloaded.
9. I've gone ahead and Run AutoPkg, and it's in the process of getting Flash for me.
When the recipe has finished running, I can check in the default folder location for the downloaded package.
11. If you have Suspicious Package handy, you can check the contents of the downloaded pkg before you test the installer.
12. Once you have the pkg (or whatever other recipe type you prefer) you can test, upload to your MDM service of choice, and be on your way. There really isn't a better way to get pkgs! (Except maybe setting up some integrations in the Folders & Integrations tab to automate uploading them to your management service automagically…)
Acknowledgements
Many thanks to the wonderful folks at the Linde Group for developing such a handy tool and making it free to use!Did you find this post useful? Leave me a tip!
💖
Write a comment
Post a Comment